
Agent-based Connections
Bigeye Agent Installation Guide
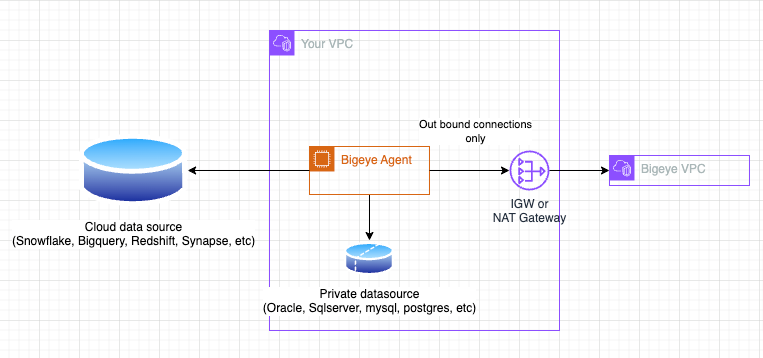
Bigeye provides a Docker image for hosting the Bigeye Data Source Agent on your infrastructure. The agent may be deployed as a standard Docker container instance using tools such as docker run or docker-compose. You may also use container orchestration systems such as Kubernetes.
The agent itself only makes outbound connections to send metric results to Bigeye's SaaS infrastructure, so no inbound access to your infrastructure is required.
Requirements
Pre-Install Checklist
You will need the following information to install the Bigeye agent.
-
Set up a VM / host
- Minimum HW size: 4 CPU, 16GB memory, 25GB disk space on /var is recommended.
i. AWS t3.xlarge
ii. GCP e2-standard-4
iii. Azure B4/D4 - Network access for agent subnets
i. No ingress (inbound) networking access for the agent is required (other than for internal administration; i.e. SSH)
ii. Egress (outbound) Access to the data sources you wish to add to Bigeye for monitoring
iii. Egress (outbound) Access to the Bigeye SaaS environment to pull work
iv. Egress (outbound) Access to pull the agent image from docker.io
- Minimum HW size: 4 CPU, 16GB memory, 25GB disk space on /var is recommended.
-
Bigeye credentials
- An Agent API Key, must be an Admin in Bigeye to create.
-
Company prefix
- This is the first part of your Bigeye URL (e.g. “app” for app.bigeye.com)
-
Docker access token
- Bigeye will provide this
Infrastructure Requirements
Other Docker platforms such as AWS ECS, orchestration systems such as Nomad, or container solutions like podman will work, but their installation is not supported by Bigeye.
Host with docker
- Install docker if it is not already installed [CentOS][RHEL][Debian][Ubuntu]
- NOTE for RHEL, the official docker instructions don't quite work. Using docker's CENTOS yum repository instead is a good workaround.
-
sudo yum install -y yum-utils
sudo yum-config-manager --add-repo https://download.docker.com/linux/centos/docker-ce.repo
sudo yum install docker-ce docker-ce-cli containerd.io docker-buildx-plugin docker-compose-plugin
sudo systemctl start docker
# test it
sudo docker run hello-world
- You can test if docker is running by using
docker infoand getting a non-error response docker composeshould already work if you've installed docker with the above instructions. If not, install docker compose (Instructions)- Run
docker compose versionto test if it is installed correctly. The version should be 2.0 or higher.
- Run
Host with Kubernetes
- Kubernetes is available on different cloud platforms; e.g. AWS EKS, Azure AKS, GCP GKE. It's also available through Rancher, Red Hat OpenShift, etc.
NOTE: Even if deployed on Kubernetes, Docker is required for a one time configuration of the agent (steps below).
Configuration
1. Generate agent encryption keys and configuration
mkdir agent_config

# Run setup script
# -p app - single-tenant saas customers will use something different (ask Bigeye)

docker run --rm -it -v "${PWD}/agent_config:/app/config" --entrypoint setup_agent.sh docker.io/bigeyedata/agent:latest -p app
The setup script will prompt you for your Agent API Key. This is used to exchange Encryption certs with Bigeye's infrastructure.
A description of the files that are generated by the above script can be found in the Appendix.
When using multiple agentsAll the keys generated in this step need to be used across agents. If a new set of keys is generated with the command above, it invalidates the previous.
2. Add data sources to the agent
Edit agent_config/agent.yaml and add each source. For each source you will need:
- Warehouse type (MySQL, Oracle, Redshift, etc)
- Hostname or IP address
- Port number
- Username
- Password (double quotes in the password should be escaped with a , ie
"my_pass\"_with_a_double_quote") - Database name
Source Timeout
By default, sources are configured with a timeout of 10 minutes (600 s). If required, users can edit this with the timeoutSeconds parameter for each connection; with the max value being 1 hour (3600 s). It should be aligned with the fields listed above and use the integer value in seconds; e.g. timeoutSeconds: 1200
Workspaces
To limit agent sources to only certain workspaces, you can configure the allowed workspace IDs in the agent's agent.yaml. You can set the workspaces at the agent level or the source level. We will use the agent level settings as a fallback if the source level settings are not set. If neither are set, we will allow all workspaces as before. These settings are optional, but highly recommended.
An example of such a config at the agent level is given below, under the defaultAllowedWorkspaces key:
companyUuid: <company_uuid>

defaultAllowedWorkspaces: [1, 2]
workflowUrl: app-workflows.bigeye.com

agentApiKey: bigeye_agent_*********

publicEncryptionKeyDir: /app/config
privateEncryptionKeyPath: /app/config/private.pem

logQueries: false
healthLoggerEnabled: true
Another example of a config at the source level is given below, under the allowedWorkspaces key:
sources:
  - identifier: 'Oracle test agent'
    allowedWorkspaces: [2, 3]
    connectionFactory:
      type: oracle
      host: test.test
      port: 1521
      user: <username>
      password: <password>
      databaseName: <databaseName>
Install
Docker
Docker compose is a docker native tool that is used to define docker containers as yaml configuration instead of having to manage them on the command-line with flags etc. It will be used heavily for installing and running the agent.
Create docker-compose.yaml
Download bigeye-agent-docker-compose.yaml as docker-compose.yaml and pull the latest agent image.
wget https://bigeye-public-web.s3.amazonaws.com/bigeye-agent-docker-compose.yaml --output-document=docker-compose.yaml
docker compose pull
Anytime you wish to install the latest version of the agent, docker compose pull can be run again to pull the latest image.
If docker compose is not able to be installed, the native docker commands are in the Appendix and can be used instead.
If docker pull is not possible on the system where you will be running the agent, there are instructions on how to import/export the container from a test system instead in the Appendix.
Running the Agent
Note: All configuration steps above must be complete before deploying the agent.
# The -d flag (detach) runs the container in the background
docker compose up -d

# Check that the container is running
docker ps -f name=bigeye-agent

# View container logs (-f can be used to “tail” the logs)
docker compose logs

# Stopping the agent if desired
docker compose down
To confirm that the container started successfully, look for a line in the Docker log similar to the following:
INFO Agent started successfully in 4076ms. Polling for activities...Note that you can launch more instances of the Agent on the same machine by copying the bigeye-agent block in docker-compose.yaml (be sure to name it something else ie bigeye-agent-xxx).
Kubernetes
Download bigeye-agent-kubernetes.yaml
Configure Kubernetes
# Download K8s yaml
wget https://bigeye-public-web.s3.amazonaws.com/bigeye-agent-kubernetes.yaml

# Create a namespace for Bigeye resources (the default in the yaml file is bigeye)
kubectl create namespace bigeye

# Create a configmap for the configuration files above (the default in the yaml file is agent-config)
kubectl create configmap agent-config --from-file=agent_config/ -n bigeye
Running the Agent
Note: All configuration steps above must be complete before deploying the agent.
# Create the deployment with the yaml file
kubectl create -f bigeye-agent-kubernetes.yaml

# Check that the pod is running.
kubectl get pods -n bigeye

NAME                            READY   STATUS    RESTARTS   AGE
bigeye-agent-1abg9c7987-l72xq   1/1     Running   0           1m

# View logs (-f can be used to “tail” the logs)
kubectl logs -l app=bigeye-agent -n bigeye --previous=false

# Delete the deployment if desired
kubectl delete -f bigeye-agent-kubernetes.yaml
To confirm that the agent started successfully, look for a line in the log similar to the following:
INFO Agent started successfully in 4076ms. Polling for activities...Note: A secret can be used for the agent configuration, as well.
# Create generic secret
kubectl create secret generic agent-config --from-file=agent_config/ -n bigeye
The yaml file would need to be updated to reference the secret instead of the configmap.
volumes:
  # - name: agent-config
  #   configMap:
  #     name: agent-config
  - name: agent-config
    secret:
      secretName: agent-config
Add data sources in Bigeye UI
Log into the Bigeye UI ie https://app.bigeye.com for multi-tenant saas or https://<company>.bigeye.com for single-tenant saas.
- Go to Catalogs view
- Select the Add source button in the upper right hand
- Select the data source type (ie. Snowflake)
- Select Connect with in-VPC agent
- The Name field in the next screen much match exactly the Identifier field that was used in agent.yaml
- The rest of the steps beyond this will be the same as a directly connected data source (non-agent). https://docs.bigeye.com/docs/getting-started#1-connect-your-sources
Troubleshooting
Common agent errors in agent log
io.grpc.StatusRuntimeException: PERMISSION_DENIED: Request unauthorized
- Description: The Agent API Key is no longer valid, or has failed to authenticate.
- Fix:
- Verify your Agent API Key is valid.
- If it is no longer valid, provision a new Agent API Key.
- Replace the
agentApiKeyvalue in youragent.yamlfile with the new key.
javax.net.ssl.SSLException: error:10000412:SSL routines:OPENSSL_internal:SSLV3_ALERT_BAD_CERTIFICATE
- Description: Certificate given to Bigeye in “Step 2. Upload agent authentication key” does not match.
- Fix: Work with Bigeye support to resolve this (
config/mtls_ca.pemmd5 should be checked and in Bigeye’s workflow service)
Deadline exceeded (DEADLINE_EXCEEDED)
- Description: Network connectivity between the Bigeye agent and the Bigeye workflow service does not work
- Fix:
- Check that workflowUrl is set correctly in
./config/agent.yaml - Check that the port is open, ie nmap -Pn -p 443 <workflowUrl from above step>
- Nmap should return “open” as the state of the port and not “filtered”
PORT STATE SERVICE 443/tcp open https - Find out why network connectivity is not working and resolve
- Check that workflowUrl is set correctly in
Exception in thread "main" io.grpc.StatusRuntimeException: CANCELLED: RST_STREAM closed stream. HTTP/2 error code: CANCEL
- Description: Something in the networking infrastructure is closing the connection between the agent and Bigeye SaaS.
- Fix: Work with your security / networking team to find where this is happening. Something that helps narrow things down greatly is to prove the agent and configs work from outside of your production network. IE start the agent with the same configuration files on a laptop at home/office (somewhere not in the production network).
jdbc timeout / error reaching host:port
- Description: Networking connectivity between the agent and the data source is not set up.
- Fix: Likely culprits are firewalls or subnets that do not have a route to reach the subnet that the data source is running on
io.grpc.StatusRuntimeException: UNAVAILABLE: error reading from server: EOF
- Description: Yaml formatting error in
./config/agent.yaml - Fix: Typically this will be improper indentation or a missing quote in the agent config file.
Http2Exception: First received frame was not SETTINGS. Hex dump for first 5 bytes: 485454502f
- Description: The agent is detecting that an "HTTP" connection is being established on the server side, but we are using GRPC for communication which is HTTP2. This can happen if there is a proxy in the self-hosted environment between the agent and Bigeye infrastructure.
- Fix: Ensure that the proxy can handle HTTP2 connections or route agent connections directly to Bigeye infrastructure and do not go through the proxy
Exception: java.lang.OutOfMemoryError
- Description: The agent has run out of memory and will crash.
- Fix: Either add more memory to the host or constrain the amount of memory allocated for the agent as described in this link: https://docs.bigeye.com/docs/agent-connection#set-the-amount-of-memory-allocated-by-the-agent
java.sql.SQLException: Unable to load class: com.teradata.jdbc.TeraDriver
Teradata requires downloading their JDBC driver directly. See instructions
java.net.UnknownHostException: app-workflows.bigeye.com: Name or service not known
Caused by: java.net.UnknownHostException: app-workflows.bigeye.com: Name or service not known
	at java.base/java.net.Inet6AddressImpl.lookupAllHostAddr(Native Method)
	at java.base/java.net.InetAddress$PlatformNameService.lookupAllHostAddr(InetAddress.java:934)
...
Notice the Inet6AddressImpl.* portion. The agent can accept a flag to coerce it to prefer ipv4 addresses. Set the following JDK_JAVA_OPTIONS environment variable in the bigeye docker-compose.yaml file. It is rare to need this flag, but if you see the above Inet6 UnknownHostException above, this is the fix.
JDK_JAVA_OPTIONS: "-Djava.net.preferIPv4Stack=true"Appendix
Import Image Archive
If docker pull can not be used on the production system where the agent will be run, use the following instructions to save and transfer the docker image from a test system / local workstation.
save the agent image as a file
Follow the docker compose pull instructions on a test system to pull the agent image. Then export the image to a file using docker save.
# Export image to file
docker save docker.io/bigeyedata/agent:latest > bigeye_agent_$(date '+%Y-%m-%d').tar
import the agent image on the production system
Copy the image archive file to the system where the agent will be run. Import it onto the host that will be running the agent using the commands below.
# Import image
docker load -i < Path to image archive here >

# Verify the image was loaded successfully
docker image ls bigeyedata/agent:latest
Running without docker compose
It's possible to use docker run directly if a newer version of docker that has docker compose is not available.
# “docker logout” is required first if you are already logged in as a different account

docker login --username bigeyedata --password <docker access token>

docker pull docker.io/bigeyedata/agent:latest

docker run -d --name bigeye-agent -v ${PWD}/agent_config:/app/config/ --restart always docker.io/bigeyedata/agent:latest

docker logs bigeye-agent
AWS Secrets manager
The agent can read your data source password from AWS Secrets Manager instead of having the password in plain text in agent.yaml. Use the asmSecretNameForPassword key instead of password within the connectionFactory. By default, the agent will use the AWS IAM Role associated with your EC2 instance or container. If you choose to use an AWS IAM User credentials, you must also specify the following values in agent.yaml:
awsAccessKey- from the IAM UserawsSecretKey- from the IAM Userregion- the AWS region where the secrets are
sources:
  - identifier: some snowflake db1 using aws secrets manager for password
    connectionFactory:
      type: snowflake
      host: mycompany.snowflakecomputing.com
      port:
      user: user
      # AWS Secrets Manager secret name
      asmSecretNameForPassword: my/aws/secret_manager/secret_name
      databaseName: somedb1

# Only specify the following 3 if you are using an AWS IAM User instead of AWS IAM Role
awsAccessKey: AKIAIOSFODNN7EXAMPLE (ie what normally goes in AWS_ACCESS_KEY_ID)
awsSecretKey: wJalrXUtnFEMI/K7MDENG/bPxRfiCYEXAMPLEKEY (ie what normally goes in AWS_SECRET_ACCESS_KEY)
region: us-east-1 (AWS region where AWS secrets manager secret resides)
Environment variable for password
The agent.yaml can accept environment variables in place of the plain text. This is useful for things like data source credentials, and the agent API key. Update agent.yaml to use an environment variable for the user and password like shown below. The syntax is specific, do not wrap the variable in quotes: ${good} "${bad}"
# Example data source using environment vars for credentials
  - identifier: db with env vars for creds
    connectionFactory:
      type: snowflake
      host: mycompany.snowflakecomputing.com
      port: 443
      user: ${SECRET_USERNAME}
      password: ${SECRET_PASSWORD}
      databaseName: somedb
Docker
Then update docker-compose.yaml to pass through the environment variables (last 3 lines):
version: "3.9"
services:
  bigeye-agent:
    image: "docker.io/bigeyedata/agent:latest"
    restart: always
    volumes:
      - "${PWD}/agent_config:/app/config"

    environment:
      - SECRET_USERNAME
      - SECRET_PASSWORD
Kubernetes
Create secrets to store the environment variables, and update bigeye-agent-kubernetes.yaml to reference them:
# Create a secret from the values
kubectl create secret generic agent-key --from-literal=agent-api-key="fake_agent_apikey"
kubectl create secret generic db-pass --from-literal=db-password="someDBpassword"containers:
- name: bigeye-agent
image: docker.io/bigeyedata/agent:latest
env:
- name: SECRET_PASSWORD
valueFrom:
secretKeyRef:
name: db-pass
key: db-password
- name: AGENT_API_KEY
valueFrom:
secretKeyRef:
name: agent-key
key: agent-api-keyWrite a script that can retrieve the credentials
Finally write a script that can retrieve secrets from your password keeper (HashiCorp Vault, Azure Key Vault, etc) and use that to populate the environment variables
export SECRET_USERNAME=$(username_script.sh)
export SECRET_PASSWORD=$(password_script.sh)

docker compose up
(Optional) Automate
There are many ways of automating this. A low effort way would be to put the variable exports into your .bashrc or .bash_profile so the environment variable is populated on login, then you don't have to remember to set it before running docker compose up.
Description of files in the agent_config directory
This is a catalog of the files that get created during agent setup in agent_config and a description of what they are used for.
Configuration
- agent.yaml - Configuration file for the agent. Datasource connection info goes here, along with flags for the agent to enable query logging, setting company uuid etc.
Encryption certs (encryption at rest)
- <company_uuid>.pem, bigeye.pem - these are used for signing/verifying signing of encryption key pair
- private.pem - public certificate used to encrypt payloads for the agent
- private.key - private key used to decrypt payloads from Bigeye
mTLS certs (If you have moved to API Keys, you may delete these)
- mtls.key - private key used in mTLS connections with Bigeye infrastructure
- mtls.pem - public certificate used in mTLS connections with Bigeye infrastructure
- mtls_ca.key - private key to use as a certificate authority for self-signing mtls certs
- mtls_ca.pem - public certificate for local certificate authority. This is sent to Bigeye so it can be trusted from Bigeye's infrastructure. Bigeye's infrastructure will then trusts connections using mtls key pairs that are generated from the mtls_ca.key
- bigeye_workflows_ca.pem - public certificate for Bigeye's CA. This allows the agent to trust connections from Bigeye infrastructure.
Use custom trusted CA certificates
You may wish to use mTLS certificates signed by your own internal certificate authority for connecting to data sources. The agent supports adding additional certificates to the trusted CA list as of agent version 1.0.6.
To use additional CA trust certificates with the agent, put your custom certs in a new subdirectory agent_config/user_ca and restart the agent. The agent will import all CA certificates in that directory into its trust list.
mkdir agent_config/user_ca

# Copy the CA certificate file to the new directory
cp < path to CA certificate file > agent_config/user_ca/

# Restart the container to load the new CA certificates
docker compose restart
Note" The CA certificates file names must end in .pem (i.e. custom_ca.pem).
Use a proxy
If all requests on your VM for the Bigeye agent are required to go through a proxy, then there may be some additional steps required to get everything installed successfully.
-
Configure docker daemon with systemd file
- See official docker documentation here - This is required to be able to login and pull images from our private docker repository where the bigeye agent images are hosted.
- If this step is missed, then when running
docker loginyou will receive this error message.Error response from daemon: Get "https://registry-1.docker.io/v2/": net/http: TLS handshake timeout
-
Set the
HTTP_PROXYandHTTPS_PROXYenvironment variables for the VM- In order to download our docker compose file, you will need to set these environment variables using the below commands. This will allow you to run the
wgetcommand in our instructions to download our docker compose file. -
export http_proxy=http://someproxy.etc.com:8080
export https_proxy=http://someproxy.etc.com:8080
export no_proxy='*.etc.com,127.0.0.0/8'  # only if required
- In order to download our docker compose file, you will need to set these environment variables using the below commands. This will allow you to run the
-
Configure your docker
config.jsonto use a proxy server- See official docker documentation here - This is required to configure the Docker CLI to use proxies via environment variables in containers.
- If this step is missed, then you will have errors while running the setup script for the bigeye agent.
-
Update the Bigeye docker-compose.yaml file
- Set the proxy settings in the bigeye docker-compose.yaml file so that the Bigeye agent knows to forward all requests through that proxy. See example below, the proxy settings should be placed using the
JDK_JAVA_OPTIONSvariable under the environment section of the docker-compose.yaml file.
JDK_JAVA_OPTIONS: -Dhttp.proxyHost=someproxy.etc.com -Dhttp.proxyPort=8080 -Dhttps.proxyHost=someproxy.etc.com -Dhttps.proxyPort=8080 -Dhttp.nonProxyHosts=*.etc.com|127.0.0.0/8 - Set the proxy settings in the bigeye docker-compose.yaml file so that the Bigeye agent knows to forward all requests through that proxy. See example below, the proxy settings should be placed using the
Set the amount of memory allocated by the agent
By default, the agent is set to allocate 75% of system memory for the JVM. If there are other processes that run on the host, this will lead to the Out of Memory condition. You can set the amount of memory allocated for the JVM by setting the MAX_RAM_PERCENTAGE environment variable to something smaller than 75 (that's the default). 25 for example would translate to 25% of system memory.
Setting this to something smaller than default not recommended unless there are other processes sharing the host. If the agent is the only thing that will run on the host, increase the memory on the host to solve this problem.
An example bigeye-agent-docker-compose.yaml setting the MAX_RAM_PERCENTAGE environment variable to 25% of system memory is below
version: "3.9"
services:

  bigeye-agent:
    # defines the image being used (ie what would normally be done with docker pull <image>
    image: "docker.io/bigeyedata/agent:latest"

    # This tells docker to restart if the container fails, the OS is restarted etc
    restart: always

    # This is how we will pass configuration files into the container, by mounting a directory.
    # The path for the source directory can be changed as desired, but the path on the docker
    # container that is being mounted must remain /app/config
    volumes:
      - "${PWD}/agent_config:/app/config"
    # Rotate logs to restrict total size to 1GB
    logging:
      driver: "json-file"
      options:
        max-size: "100m"
        max-file: "10"

    environment:
      MAX_RAM_PERCENTAGE: "25"
Teradata JDBC driver
It is possible to include custom JDBC drivers for the agent to load at runtime. Teradata for example, does not allow redistribution of their JDBC driver, so you will need to download it and make it available to the Bigeye Data Source Agent.
Download the driver into the agent_config directory, it will be loaded automatically when the agent is started.
curl -O --output-dir ./agent_config https://repo1.maven.org/maven2/com/teradata/jdbc/terajdbc/20.00.00.25/terajdbc-20.00.00.25.jarCustom path to JDBC driver
If you would like to place custom JDBC drivers in a directory that is not the agent_config directory, you can do so by
Docker
- add your custom directory to the list of volumes mounted by the container in
bigeye-agent-docker-compose.yaml
volumes:
      - "${PWD}/agent_config:/app/config"
- "/lib/custom_jdbc_drivers:/app/custom_jdbc_drivers"- set the
DRIVER_DIRenvironment variable to include the directory. A wildcard is useful for convenience vs listing out every jar file. Note that the driver files must have a.jarextension.
    environment:
      DRIVER_DIR: "/app/custom_jdbc_drivers/*"
Kubernetes
- add an Init Container to pull in the JDBC drivers to a shared volume mount in
bigeye-agent-kubernetes.yamlinitContainers: - name: initdownload image: busybox:latest command: ['sh', '-c', 'wget -O /app/custom_jdbc_drivers/terajdbc4.jar https://repo1.maven.org/maven2/com/teradata/jdbc/terajdbc4/17.20.00.12/terajdbc4-17.20.00.12.jar'] volumeMounts: - name: custom-jdbc mountPath: /app/custom_jdbc_drivers/ - update the bigeye-agent container, to include the volume mount from the init container and the
DRIVER_DIRenvironment variable
- name: bigeye-agent
  image: docker.io/bigeyedata/agent:latest
  env:
    - name: DRIVER_DIR
      value: /app/custom_jdbc_drivers/*
  volumeMounts:
    - name: agent-config
      mountPath: /app/config/
    - name: custom-jdbc
mountPath: /app/custom_jdbc_drivers/- update the volumes section to include the volume
volumes:
  - name: agent-config
    configMap:
      name: agent-config
  - name: custom-jdbc
NOTE: If you are unable to utilize an Init Container, you may also use Persistent Volume Storage to mount custom JDBC drivers. Work with your infrastructure team to configure one to your company's standards.
Custom JDBC parameters
Requires agent version 1.20.0 or later.
If you need some custom parameters to be added to the JDBCUrl, this can be configured in the agent_config/agent.yaml
# defaults to false; when true logs the urls to the console
logUrls: true

sources:
  - identifier: snowflake agent
    connectionFactory:
      type: snowflake
      host: mysubdomain.snowflakecomputing.com
      user: myuser
      password: mypass
      port: 443
      databaseName: myWarehouse
      additionalJdbcProperties:
        customIntProperty: 0
        customBooleanProperty: TRUE
        customStringProperty: "some_string"
This will append the custom properties to the JDBC url according to the appropriate syntax for that driver.
To validate, you can add logUrls: true to the agent_config/agent.yaml to log the urls that we are using. This will produce a line like the following:
13:50:58.290 INFO c.b.agent.BigeyeAgentApplication - Connecting to source "snowflake agent" with url "jdbc:snowflake://mysubdomain.snowflakecomputing.com/?user=<username>&warehouse=myWarehouse&STATEMENT_TIMEOUT_IN_SECONDS=600&JDBC_QUERY_RESULT_FORMAT=JSON&customIntProperty=0&customBooleanProperty=TRUE&customStringProperty=some_string"Disabling the flag (the default) will disable those logs again.
Netezza JDBC driver
Like Teradata, Netezza does not allow redistribution of their JDBC driver, so the user will need to make it available to the Bigeye Data Source Agent. This jar is not available in maven repositories to download, so the user will have to make a copy of the jar file to a directory specified for the agent to pick it up.
Custom path to JDBC driver
If you would like to place custom JDBC drivers in a directory that is not the agent_config directory, you can do so by
Docker
- add your custom directory to the list of volumes mounted by the container in
bigeye-agent-docker-compose.yaml
volumes:
      - "${PWD}/agent_config:/app/config"
- "/lib/custom_jdbc_drivers:/app/custom_jdbc_drivers"- set the
DRIVER_DIRenvironment variable to include the directory. A wildcard is useful for convenience vs listing out every jar file. Note that the driver files must have a.jarextension.
    environment:
      DRIVER_DIR: "/app/custom_jdbc_drivers/*"
Kubernetes
- The JDBC drivers should be copied by the user to the
DRIVER_DIR. - update the bigeye-agent container, to include the volume mount from the init container and the
DRIVER_DIRenvironment variable
- name: bigeye-agent
  image: docker.io/bigeyedata/agent:latest
  env:
    - name: DRIVER_DIR
      value: /app/custom_jdbc_drivers/*
  volumeMounts:
    - name: agent-config
      mountPath: /app/config/
    - name: custom-jdbc
mountPath: /app/custom_jdbc_drivers/- update the volumes section to include the volume
volumes:
  - name: agent-config
    configMap:
      name: agent-config
  - name: custom-jdbc
NOTE: If you are unable to utilize an Init Container, you may also use Persistent Volume Storage to mount custom JDBC drivers. Work with your infrastructure team to configure one to your company's standards.
Renaming agent sources
If you have an agent source already configured in the Bigeye UI, and you want to rename it while preserving metrics that have already been deployed, you can do so with the following steps:
-
Stop the agent
# Stop docker docker compose down # Stop kubernetes kubectl delete -f bigeye-agent-kubernetes.yaml -
Update the source in
agent.yamlwith the new identifiersources: # Update the identifier field with the new name - identifier: snowflake agent updated connectionFactory: type: snowflake host: mysubdomain.snowflakecomputing.com user: myuser password: mypass port: 443 databaseName: myWarehouse -
Restart the agent and wait until a connection is established. For K8s you need to redeploy the config map with the updated
agent.yamlfile.# ==== Docker ==== # Start agent docker compose up # ==== Kubernetes ==== # Update K8s ConfigMap kubectl create configmap agent-config --from-file=agent_config/ -n bigeye -o yaml --dry-run=client | kubectl apply -f - # Deploy the agent kubectl apply -f bigeye-agent-kubernetes.yaml # Look for the updated name in the logs, and wait for the agent to start INFO WorkflowId=[] c.b.a.r.JdbcDataSourceResolver - Initializing new pooled data source for "snowflake agent updated" INFO WorkflowId=[] c.b.agent.BigeyeAgentApplication - Agent started successfully in 7562ms. Polling for activities... -
Update the source name in Bigeye via the API. NOTE: The source and the workspace IDs are visible in the URL when navigating to the source from the Bigeye catalog; e.g.
https://app.bigeye.com/w/<workspace_id>/catalog/data-sources/<source_id>/scorecardcurl --location 'https://app.bigeye.com/api/v1/sources' \ --header 'Content-Type: application/json' \ --header 'Authorization: apikey <bigeye_pak_yourapikey>' \ --data '{ "name": "snowflake agent updated", "id": <source_id>, "temporalAgentSecret": "exists", "workspaceId": <workspace_id> }'
Encrypted passwords
Starting in data source agent 3.2.0, we have the ability to encrypt the credentials in the config yaml file via a docker run command.
docker run agent:3.2.0 encrypt_string myCreds
AGENT VERSION: 3.2.0
... log output ...
<output string>
The encrypted password can be used in the config file as long as the passwordEncrypted: true line is added
  - identifier: myIdentifier
    connectionFactory:
      type: snowflake
      host: mypartner.snowflakecomputing.com
      user: myuser
      password: ouputFromEncryption
      passwordEncrypted: true
      port: 3306
      databaseName: myDatabase
Updated about 2 months ago