
Connect Databricks
Connect your Databricks source to Bigeye, we recommend using serverless SQL warehouses on Databricks for cost efficiency.
1. Allow Bigeye's IP address
If you've set up network policies to restrict the IP addresses that communicate with your Databricks instance, modify these policies to allow all of Bigeye's Static IP addresses .
2 Give Bigeye access to Databricks
2.1 Generate a service principal for Bigeye to use.
Credentials are needed for Bigeye to connect to Databricks. We recommend that you create a service principal and generate an access token for that service principal. We also support OAuth M2M tokens.
- Create service principal in the Databricks Account Console by going to Admin Settings -> Identity and Access -> Manage Service Principals -> Add service principal. Note the service principal's application id
2.2.1 Access token
- Give access token permissions to the service principal by following these instructions from Databricks.
- Generate an access token for the service principal by following these instructions from Databricks.
2.2.2 OAuth M2M Token
- Create an M2M token for the service principal by following these instructions from Databricks. Note the Secret and the Client ID.
2.2 Grant permissions to Bigeye's service principal
2.2.1 Unity Catalog
If you want to Grant access to all existing and future tables within catalog
GRANT USE_CATALOG ON CATALOG <catalog_name> TO `<application_id>`;
GRANT USE_SCHEMA ON CATALOG <catalog_name> TO `<application_id>`;
GRANT SELECT ON CATALOG <catalog_name> TO `<application_id>`;
If you want to Grant access to specific tables
GRANT USE_CATALOG ON CATALOG <catalog_name> TO `<application_id>`;
GRANT USE_SCHEMA ON SCHEMA <catalog_name>.<schema_name> TO `<application_id>`;
GRANT SELECT ON TABLE <catalog_name>.<schema_name>.<table_name> TO `<application_id>`;
2.2.2 Hive Metastore
GRANT READ_METADATA, USAGE, SELECT ON catalog <catalog_name> to `<application_id>`3. Gather connection details from Delta Lake
Login to your Delta Lake account.
- Click Compute in the sidebar.
- Choose a cluster to connect to.
- Navigate to Advanced Options.
- Click the JDBC/ODBC tab.
- Copy Server Hostname, Port, and Http Path.
4. Add Databricks as a data source in Bigeye
Login to your Bigeye account.
On the Catalog page, click Add Source and then select Databricks from the Choose a data source section. Click Next to configure the connection to your database.

On the Configure source modal that opens, first select the authentication type that you are using and enter the following details:
4.1 Access token
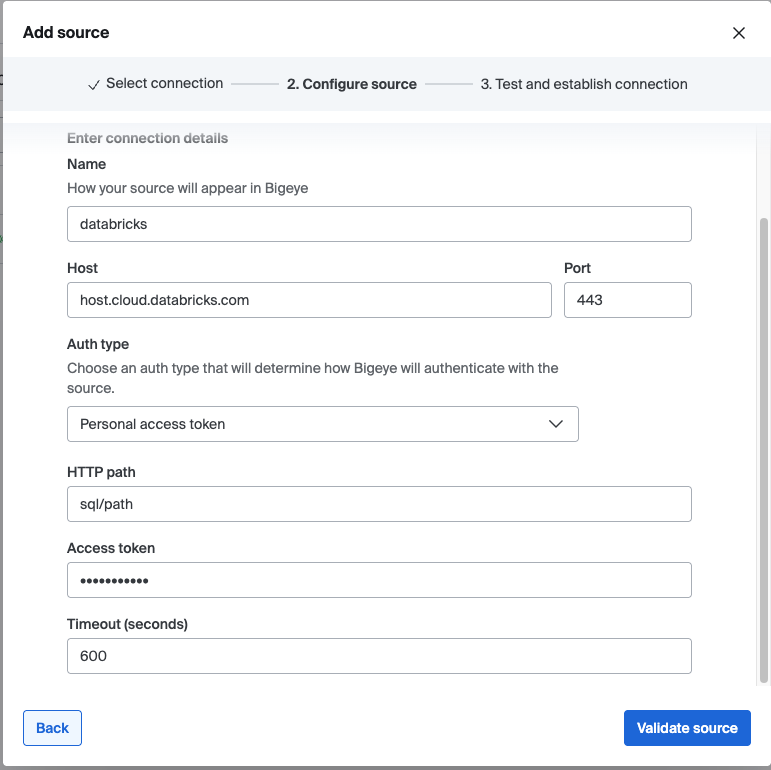
| Field Name | Description |
|---|---|
| Name | The identifying name of the data source in Bigeye. |
| Host | The hostname from step 3. |
| Port | The port from step 3. |
| AuthType | Personal access token |
| HTTP path | The HTTP path from step 3. |
| Access token | The access token for the service principal from step 2.2.1.2. |
4.2 OAuth M2M Token
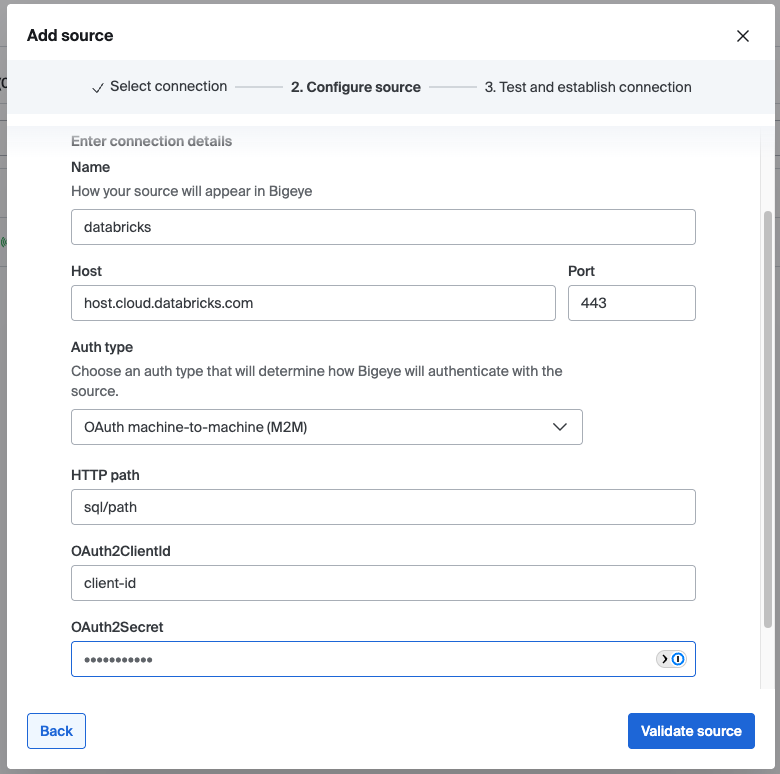
| Field Name | Description |
|---|---|
| Name | The identifying name of the data source in Bigeye. |
| Host | The hostname from step 3. |
| Port | The port from step 3. |
| AuthType | OAuth machine-to-machine (M2M) |
| HTTP path | The HTTP path from step 3. |
| OAuth2ClientId | The OAuth id from step 2.2.2.1. |
| OAuth2Secret | The OAuth secret from step 2.2.2.1. |
5. Next Steps
After you've configured the source, Bigeye loads and profiles your tables. It can take up to 24 hours for the profiling to complete and your autometrics and autothresholds to populate. See how to deploy autometrics in the Getting Started guide.
Updated 8 months ago