
Validate dbt Model Changes Using Bigeye Deltas
Growing demand for data puts Analytics Engineers under pressure to move quickly without introducing bugs to their models. This article will cover how to achieve CI/CD best practices in Analytics Engineering by automatically validating dbt (data build tool) model changes using Bigeye's deltas feature.
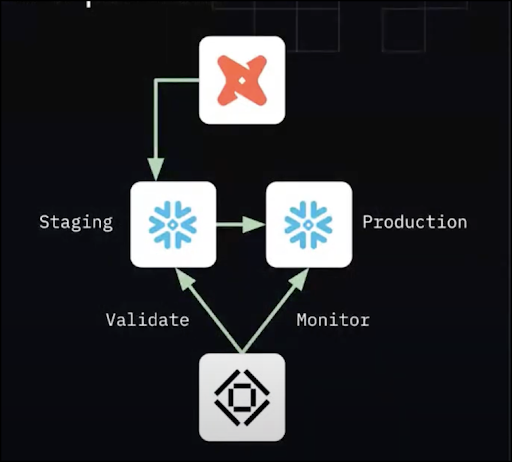
By integrating dbt Cloud with Github, or any other VCS vendor, you can automate the process of creating staging environments for your data models. With dbt Cloud, you can use GitHub as your version control system for your dbt models and automate the creation of a staging environment for each branch. This makes it easier to test changes in isolation and avoid impacting production data.
Bigeye Deltas can help you compare the data in your staging tables with the data in your production tables, allowing you to validate that your changes have not introduced any unexpected differences.
GitHub Actions can orchestrate the entire process, automating tasks such as running tests, building and deploying models, and creating Bigeye Deltas. This can help ensure that your development process is efficient, consistent, and reliable, reducing the risk of breaking things in production.
- Create dbt Cloud Staging Tables
Dbt Cloud staging tables are temporary tables created for testing and development purposes. They are typically used to validate changes to data models before deploying them to production. Using a dbt Cloud CI job, you can configure a process that automatically deploys dbt models that have changed to a new environment inside your cloud data warehouse. There are a couple of ways to do this, but one setup would be to create a job with the following settings:
Execution Settings:
- Run Timeout: Never
- Defer to a previous run state? Yes; Defer to Scheduled Refresh Production Job (or whatever this is named for your dbt Cloud instance)
- Commands:
dbt seed
dbt run -m state:modified+1,state:modified+
dbt test -m state:modified+1,state:modified+
Triggers -> Continuous Integration (CI):
- Run on Pull Request: Yes
- Run only on Custom Branch: No
With the above setup, whenever you create a new pull request to change a dbt model, the staging tables will automatically be created inside your cloud data warehouse. This allows you to test changes in isolation and avoid impacting production data. Dbt Cloud staging tables can streamline your development process and reduce the risk of breaking things in production.
- Run Bigeye Deltas
Bigeye Deltas is a tool to compare the contents of two tables and determine if any differences exist. After creating the pull request from dbt Cloud, retrieve the name of the staging environment that was automatically created by dbt Cloud and compare the tables in that environment with the production datasets using the Bigeye deltas feature. Ensure that the service account used to monitor data in Bigeye has all the appropriate permissions to view the new staging tables.
The deltas feature can be interacted with in the UI, following the instructions in this document, or can be created programmatically using a YAML-based configuration file as shown below:
type: DELTA_CONFIGURATION_FILE
vendor: GITHUB
deltas:
- delta_name: DBT_CLOUD_PR_200.CUSTOMERS to PROD.CUSTOMERS
 source_table_id: 924
 target_table_id: 1024
 delta_column_mapping:
 - source_column_name: primary_id
   target_column_name: primary_id
   metrics:
   - type: PREDEFINED
     metric: COUNT_DISTINCT
 - source_column_name: number_of_members
   target_column_name: number_of_members
   metrics:
   - type: PREDEFINED
     metric: MIN
   - type: PREDEFINED
     metric: MAX
 all_column_metrics:
   - type: PREDEFINED
     metric: PERCENT_NULL
   - type: PREDEFINED
     metric: COUNT_DUPLICATES
 group_bys: []
 source_filters: []
 target_filters: []
 cron_schedule:
     name: Daily Run
cron: 0 0 * * *- Use GitHub Actions to Automate Deltas CI/CD
With the above configured, you can now run Bigeye deltas as part of your development workflow:
- Create a new workflow file in your GitHub repository. You can do this by creating a new file named .github/workflows/run-bigeye-deltas.yml.
- Define the action in the workflow file:
name: Run Bigeye Deltas Workflow
on:
 pull_request:
   types:
     - opened
     - edited
     - reopened
     - synchronize


env:
 GITHUB_TOKEN: ${{ secrets.GITHUB_TOKEN }}
 PR_NUMBER: ${{ github.event.number }}
 CURRENT_REPO: ${{ github.repository }}


jobs:
 run-bigeye-deltas:
   name: run-bigeye-deltas
   runs-on: ubuntu-latest
   steps:
     - name: Checkout current repository
       uses: actions/checkout@v3
       with:
         repository: bigeyedata/se-commons
         ref: delta-cicd

     - name: setup python
       uses: actions/setup-python@v2
       with:
         python-version: 3.8 #install the python needed


     - name: Install dependencies
       run: |
         python -m pip install --upgrade pip setuptools
         python -m pip install bigeye-sdk==0.4.43
         python -m pip install -e bigeye-aws
         python -m pip install -e bigeye-cli


     - name: Run Deltas CICD
run: bigeye deltas cicd -b ${{ secrets.BIGEYE_SBX_CONF }} -dcc deltas/delta_config_file.yml- Configure secrets: In the GitHub Actions workflow file, you must specify the environment variables required by the action, including the Bigeye credentials file.
With this setup, when you change your pull request, GitHub Actions initiates the custom action to run Bigeye deltas. This can help ensure that your deltas run regularly, providing up-to-date insights into the differences between your production and staging tables and giving you more confidence in your dbt model changes before promoting them to production.
Updated 10 months ago