
Connect Snowflake
Connect your Snowflake source to Bigeye.
1. Allow Bigeye's IP Address
By default, Snowflake instances are open to every IP address, so no action is required. However, if you've set up network policies to restrict the IP addresses communicating with your Snowflake instance, modify these policies to allow all of Bigeye's Static IP addresses.
There are two types of network policies you might have set up on your Snowflake instance: account level and user level. Account-level policies apply to all users unless a user-level policy overrides the policy. User-level policies only apply to the users to whom the policy is assigned, and user-level policies override account-level policies.
If you’ve configured account-level network policies, you must edit your network policy to allow incoming connections from Bigeye's IP address. Refer to the Snowflake documentation for more information on modifying account-level network policies.
If your organization uses user-level network policies, create a new policy to apply to the read-only user you create, allowing incoming connections from Bigeye's IP address. Refer to the Snowflake documentation for more information on modifying user-level network policies.
2. Connect to Snowflake
To follow these commands in Snowflake, open your Snowflake Worksheets page to run the statements below in the console. Only a user with the required permissions can run these commands, for example, ACCOUNTADMIN or SYSADMIN.
First, create a keypair for the user authentication following Snowflake's docs. The contents of the public key file will be used during user creation; the private key file and password will be used when creating the connection in Bigeye.
2.1 Define variables
-- set variables for use during creation - note that these must be ALL CAPS except public_key
set role_name = '<BIGEYE_ROLE>';
set user_name = '<BIGEYE_USER>';
set warehouse_name = '<BIGEYE_WAREHOUSE_NAME>';
set public_key = '<PUBLIC_KEY>'
2.2 Create a warehouse
Create a dedicated warehouse in Snowflake for Bigeye with the following objectProperties:
CREATE WAREHOUSE identifier($warehouse_name) WITH WAREHOUSE_SIZE='X-SMALL' AUTO_SUSPEND=60;| Property | Description | Value |
|---|---|---|
WAREHOUSE_SIZE | The size of the virtual warehouse. | XSMALL |
AUTO_SUSPEND | The number of seconds of inactivity after which a warehouse is automatically suspended. | 60 |
To learn more about creating a warehouse, see Create Warehouse in Snowflake documentation.
2.3 Create a Role for Bigeye
Create a dedicated, read-only role for Bigeye and grant permissions on the warehouse and tables you want Bigeye to monitor.
For lineage and metadata based metrics, the role needs access to the Snowflake account_usage schema.
-- create role for Bigeye
create role if not exists identifier($role_name);
grant imported privileges on database "SNOWFLAKE" to role identifier($role_name);

-- grant Bigeye role access to warehouse
grant USAGE on warehouse identifier($warehouse_name) to role identifier($role_name);

-- TODO - repeat for every database, schema, table you want
-- grant Bigeye access to data that you want to monitor
grant USAGE on database <database> to role identifier($role_name);
grant USAGE on schema <database>.<schema> to role identifier($role_name);
grant select on future tables in schema <database>.<schema> to role identifier($role_name);
grant select on all tables in schema <database>.<schema> to role identifier($role_name);
grant select on future views in schema <database>.<schema> to role identifier($role_name);
grant select on all views in schema <database>.<schema> to role identifier($role_name);
2.3.1 Grant Bigeye role permissions to SYSADMIN - Optional but recommended
Snowflake recommends creating a role hierarchy where lower roles have their permissions granted to higher roles. We recommend granting the Bigeye role to SYSADMIN so that SYSADMIN always has permission to do anything the Bigeye role does. Note that this does not grant SYSADMIN to the Bigeye role.
grant role identifier($role_name) to role SYSADMIN; 2.4 Create a User for Bigeye
create user if not exists $user_name
default_role = $role_name
default_warehouse = $warehouse_name
type = 'SERVICE'
rsa_public_key = $public_key;

grant role identifier($role_name) to user identifier($user_name);

-- flush everything we just did
commit;
2.5 Grant permissions to access Snowflake Intelligence data
-- (1) AI Observability events table.
-- SNOWFLAKE.AI_OBSERVABILITY_READER is the documented read-only application
-- role for SNOWFLAKE.LOCAL.AI_OBSERVABILITY_EVENTS.
GRANT APPLICATION ROLE SNOWFLAKE.AI_OBSERVABILITY_READER
    TO ROLE IDENTIFIER($role_name);

-- (2) Semantic Views + (3) Cortex Agents — account-wide read.
-- No single account-level grant exists for these object types, so we loop
-- over every standard database and apply DB-scoped ALL + FUTURE grants.
-- Shared/imported and application databases are skipped (cannot be granted
-- on directly; AI Observability above already covers the SNOWFLAKE share).
EXECUTE IMMEDIATE $$
BEGIN
    LET role_name_str STRING := $role_name;   -- read session variable
    LET role_id   STRING := '"' || REPLACE(role_name_str, '"', '""') || '"';
    SHOW DATABASES;
    LET rs RESULTSET := (
        SELECT "name" AS DB_NAME
        FROM TABLE(RESULT_SCAN(LAST_QUERY_ID()))
        WHERE "kind" = 'STANDARD'
          AND "name" NOT IN ('SNOWFLAKE', 'SNOWFLAKE_SAMPLE_DATA')
    );
    LET cur CURSOR FOR rs;
    FOR rec IN cur DO
        LET db STRING := rec.DB_NAME;
        EXECUTE IMMEDIATE 'GRANT USAGE ON DATABASE "' || db || '" TO ROLE ' || role_id;
        EXECUTE IMMEDIATE 'GRANT USAGE ON ALL SCHEMAS IN DATABASE "' || db || '" TO ROLE ' || role_id;
        EXECUTE IMMEDIATE 'GRANT USAGE ON FUTURE SCHEMAS IN DATABASE "' || db || '" TO ROLE ' || role_id;
        EXECUTE IMMEDIATE 'GRANT SELECT ON ALL SEMANTIC VIEWS IN DATABASE "' || db || '" TO ROLE ' || role_id;
        EXECUTE IMMEDIATE 'GRANT SELECT ON FUTURE SEMANTIC VIEWS IN DATABASE "' || db || '" TO ROLE ' || role_id;
        EXECUTE IMMEDIATE 'GRANT USAGE ON ALL AGENTS IN DATABASE "' || db || '" TO ROLE ' || role_id;
        EXECUTE IMMEDIATE 'GRANT USAGE ON FUTURE AGENTS IN DATABASE "' || db || '" TO ROLE ' || role_id;
    END FOR;
    RETURN 'Grants applied to all standard databases for role ' || role_name || '.';
END;
$$;
2.6 All of the commands from above in a single copy/paste block
-- set variables for use during creation - note that these must be ALL CAPS except password
set role_name = '<BIGEYE_ROLE>';
set user_name = '<BIGEYE_USER>';
set warehouse_name = '<BIGEYE_WAREHOUSE_NAME>';
set public_key = '<PUBLIC_KEY>'

-- create warehouse
CREATE WAREHOUSE identifier($warehouse_name) WITH WAREHOUSE_SIZE='X-SMALL' AUTO_SUSPEND=60;

-- create role for Bigeye
create role if not exists identifier($role_name);
grant imported privileges on database "SNOWFLAKE" to role identifier($role_name);

-- grant Bigeye role access to warehouse
grant USAGE on warehouse identifier($warehouse_name) to role identifier($role_name);

-- TODO - repeat for every database, schema, table you want
-- grant Bigeye access to data that you want to monitor
grant USAGE on database <database> to role identifier($role_name);
grant USAGE on schema <database>.<schema> to role identifier($role_name);
grant select on future tables in schema <database>.<schema> to role identifier($role_name);
grant select on all tables in schema <database>.<schema> to role identifier($role_name);
grant select on future views in schema <database>.<schema> to role identifier($role_name);
grant select on all views in schema <database>.<schema> to role identifier($role_name);

-- grant the Bigeye role to SYSADMIN (optional but recommended)
grant role identifier($role_name) to role SYSADMIN;

-- create the user
create user if not exists $user_name
default_role = $role_name
default_warehouse = $warehouse_name
type = 'SERVICE'
rsa_public_key = $public_key;

grant role identifier($role_name) to user identifier($user_name);

-- flush everything we just did
commit;

-- (1) AI Observability events table.
-- SNOWFLAKE.AI_OBSERVABILITY_READER is the documented read-only application
-- role for SNOWFLAKE.LOCAL.AI_OBSERVABILITY_EVENTS.
GRANT APPLICATION ROLE SNOWFLAKE.AI_OBSERVABILITY_READER
    TO ROLE IDENTIFIER($role_name);

-- (2) Semantic Views + (3) Cortex Agents — account-wide read.
-- No single account-level grant exists for these object types, so we loop
-- over every standard database and apply DB-scoped ALL + FUTURE grants.
-- Shared/imported and application databases are skipped (cannot be granted
-- on directly; AI Observability above already covers the SNOWFLAKE share).
EXECUTE IMMEDIATE $$
BEGIN
    LET role_name_str STRING := $role_name;   -- read session variable
    LET role_id   STRING := '"' || REPLACE(role_name_str, '"', '""') || '"';
    SHOW DATABASES;
    LET rs RESULTSET := (
        SELECT "name" AS DB_NAME
        FROM TABLE(RESULT_SCAN(LAST_QUERY_ID()))
        WHERE "kind" = 'STANDARD'
          AND "name" NOT IN ('SNOWFLAKE', 'SNOWFLAKE_SAMPLE_DATA')
    );
    LET cur CURSOR FOR rs;
    FOR rec IN cur DO
        LET db STRING := rec.DB_NAME;
        EXECUTE IMMEDIATE 'GRANT USAGE ON DATABASE "' || db || '" TO ROLE ' || role_id;
        EXECUTE IMMEDIATE 'GRANT USAGE ON ALL SCHEMAS IN DATABASE "' || db || '" TO ROLE ' || role_id;
        EXECUTE IMMEDIATE 'GRANT USAGE ON FUTURE SCHEMAS IN DATABASE "' || db || '" TO ROLE ' || role_id;
        EXECUTE IMMEDIATE 'GRANT SELECT ON ALL SEMANTIC VIEWS IN DATABASE "' || db || '" TO ROLE ' || role_id;
        EXECUTE IMMEDIATE 'GRANT SELECT ON FUTURE SEMANTIC VIEWS IN DATABASE "' || db || '" TO ROLE ' || role_id;
        EXECUTE IMMEDIATE 'GRANT USAGE ON ALL AGENTS IN DATABASE "' || db || '" TO ROLE ' || role_id;
        EXECUTE IMMEDIATE 'GRANT USAGE ON FUTURE AGENTS IN DATABASE "' || db || '" TO ROLE ' || role_id;
    END FOR;
    RETURN 'Grants applied to all standard databases for role ' || role_name || '.';
END;
$$;
3. Gather connection details from Snowflake
Gather the following connection details from Snowflake
| Connection Detail | Description |
|---|---|
| Hostname | Snowflake URL |
| Warehouse | Click Warehouses from within your Snowflake console to view a list of warehouses. Any warehouse in your account will work. |
| Username | user_name that you created in the script above |
| Password | Password created for the private key for the Bigeye user |
| Private Key File | The private key created for the Bigeye user. |
4. Add Snowflake as a data source in Bigeye
From the Catalog page, click Add source. On the modal that appears, select Snowflake.

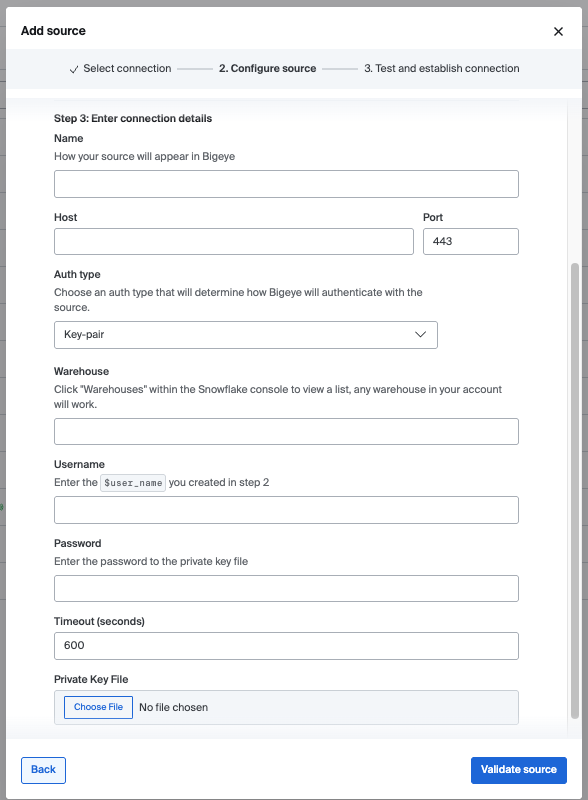
On the Configure source modal that opens, enter the following details:
| Field Name | Description |
|---|---|
| Alias | The identifying name of the data source. |
| Vendor | Snowflake |
| Hostname | The name of the server that hosts your database. |
| Port | The default port is 443. |
| Auth type | Authentication type to use; should be set to key-pair for newly created users. Can be set to username and password for legacy service accounts, although this is deprecated by Snowflake. |
| Warehouse | The name of the warehouse from step 3. |
| Username | The name of the dedicated user for Bigeye. |
| Password | The password of the encrypted private key associated with the Bigeye user. |
| Timeout | The period of non-activity in seconds, after which the database closes its connection. |
| Private Key File | The encrypted private key associated with the Bigeye user. |
Check RolesThe username will use its default role in Snowflake. Please make sure that role has the permissions it needs to see and query your tables.
5. Test connection
The system queries your warehouse to ensure the user you provided has the required permissions to read data and run all Bigeye metric types. If the test connection returns an error, return to Step 2: Create a user for Bigeye and verify that the user has all the required permissions in Snowflake.
6. Add metrics
If the test connection is successful, you will have the option to deploy Metadata Metrics on your schemas. We recommend broad coverage of these metrics across your warehouse to detect the most common data quality issues.
Metadata-Based Freshness and VolumeMetadata-based Freshness and Volume are only available if you are using the Enterprise Edition of Snowflake and not on Snowflake Standard Edition. If you are on Snowflake standard, you must use column-based Row Count and Hours Since Latest Value for volume and freshness.
After you've configured the source, Bigeye loads and profiles your tables. It can take up to 24 hours for the profiling to complete and your autometrics and autothresholds to populate. See how to deploy autometrics in the Getting Started guide.
Updated 2 months ago