
PowerBI
Service Principal Setup
To enable Bigeye to connect to Power BI and retrieve data lineage, you will need to configure a service principal and provide the necessary credentials.
1. Create a Service Principal Application
-
Log in to the Azure Portal.
-
Navigate to App registrations.
-
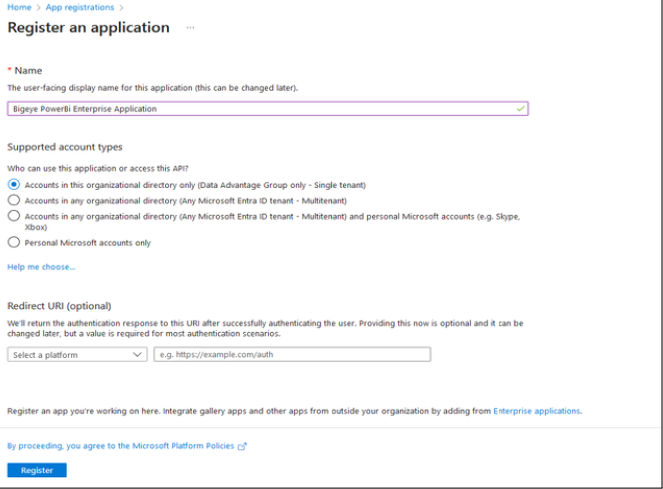
Click New registration.
- Input a registration name, e.g.,
Bigeye PowerBI Enterprise Application. - Choose the top supported account type.
- Click Register.
- Input a registration name, e.g.,
-
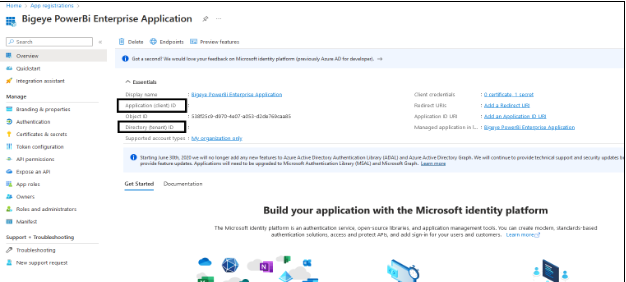
Once created, you will be redirected to the App Registration page. Select the application you just created.
- Copy the Application (Client) ID and Directory (Tenant) ID.
-
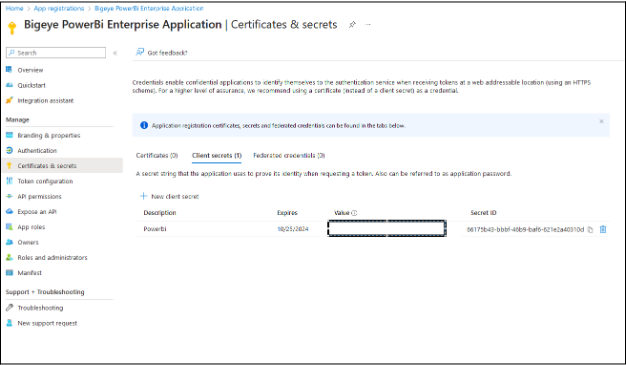
Navigate to the Certificates & secrets tab.
- Generate a new secret by clicking New client secret.
- Give the secret a name.
- Copy the generated secret from the Value column. (This will be used for authentication later.)
-
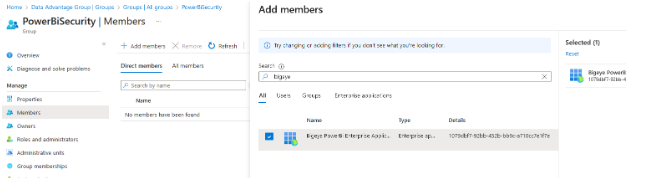
Go to the Members tab of your security group.
- Add the service principal you just created as a member.
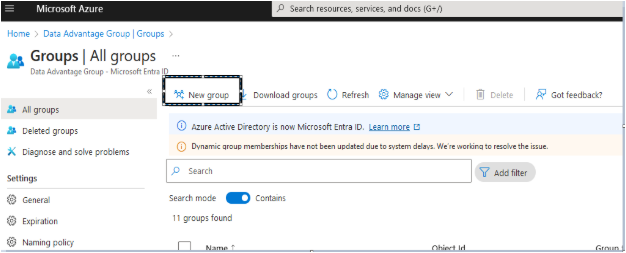
2. Create a New Security Group
- Go to Microsoft Entra ID.
- Click on Groups.
- Select New group.
- Give the new group a name, e.g.,
BigeyePowerBISecurity. - Set the Group Type to Security.
- Give the new group a name, e.g.,
3. Grant Power BI Access to the Security Group
-
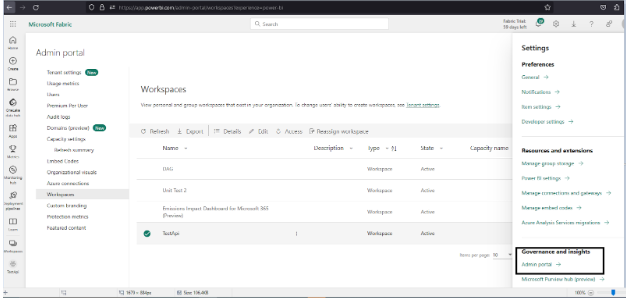
Go to the Power BI website and open the Admin portal.
-
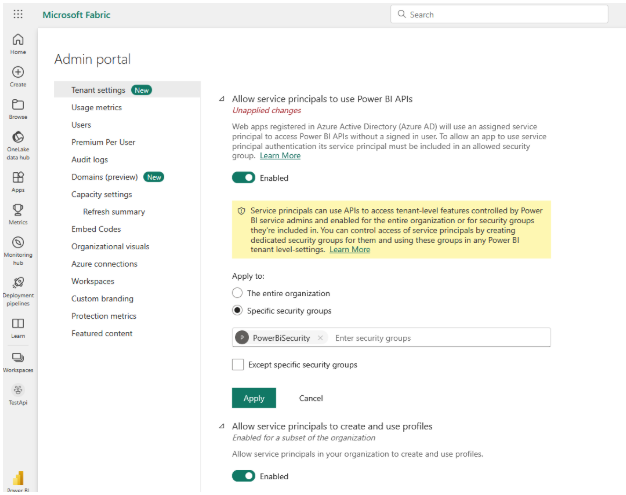
Under Tenant settings → Developer settings:
- Allow service principals to use Power BI APIs.
- Apply this setting to the security group created in Step 2 (Specific security groups).
-
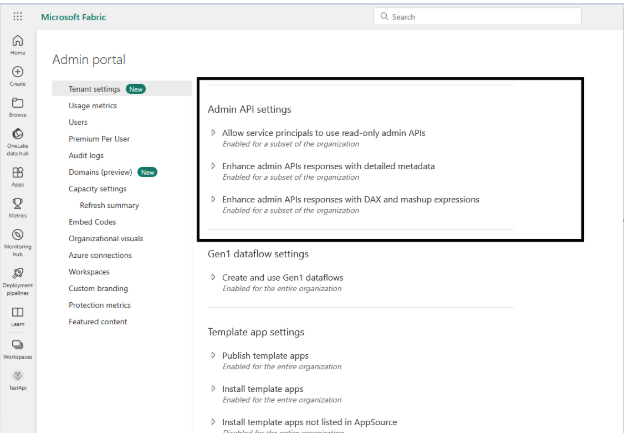
Under Admin API settings:
- Enable service principals to use the Admin APIs, enhanced metadata, and expressions.
- Expand all panels and give the security group access to all three settings.
4. Give the Service Principal Access to Workspaces
- Log in to the Power BI website and go to the Workspaces tab.
- For each workspace:
- Click Manage access.
- Click Add people or groups.
- Add the service principal (from Step 1) with Member privileges, then click Add.
- Set access level to Member.
- Repeat this process for all workspaces the service principal requires access to.
Make sure that the service principal is added to the appropriate workspaces and not the security group. Granting the security group access to the workspaces will not work as expected.
Configuration Parameters
The following fields can be configured:
powerbi.authoritypowerbi.jersey.api.timeoutpowerbi.auth.headerpowerbi.resourcepowerbi.client.idpowerbi.clientid.secret.passwordpowerbi.extract.from.cloudpowerbi.include.reports/powerbi.exclude.reportspowerbi.download.reportspowerbi.include.workspacespowerbi.include.premiumcapacity.workspacespowerbi.workspaceinfo.countpowerbi.exclude.workspacespowerbi.scan.status.waitpowerbi.read.from.jsonpowerbi.read.from.json.locationpowerbi.temptablenamepowerbi.temptablename.exceptionspowerbi.filter.visualizations.with.no.fields
Power BI Supplemental Sources
The primary Power BI connector extracts lineage from reports backed by standard database sources. For reports that rely on non-database sources (such as Excel files, SharePoint lists, or JSON APIs) or reports without a semantic model, a supplemental connector is available.
When to use
Use the supplemental connector when you have:
- Reports with non-database sources — Data sourced from Excel workbooks, SharePoint, OData feeds, or other file-based inputs
- Reports without a semantic model — Reports that have no underlying tables for the primary connector to analyze
The supplemental connector runs alongside the primary Power BI connector and contributes additional lineage and catalog metadata.
How it works
The primary Power BI connector produces JSON output files identifying reports with non-database sources and reports without semantic models. The supplemental connector reads these files and creates catalog nodes and lineage edges for the identified sources.
Catalog structure:
- Source Type (for example,
Excel Workbook,SharePoint Files)- Domain (for example,
example.sharepoint.com)- Site (for example,
teams/DataTeam) [optional]- Source (the specific data source)
- linked to consuming Power BI reports
- Source (the specific data source)
- Site (for example,
- Domain (for example,
Configuration parameters
| Property | Required | Description |
|---|---|---|
powerbi.supplemental.snapshot_dir.N | Yes* | Directory containing both output JSON files. Auto-discovers files by naming convention. |
powerbi.supplemental.non_database_sources_path.N | Yes* | Explicit path to the non-database sources JSON file |
powerbi.supplemental.no_tables_reports_path.N | Yes* | Explicit path to the no-tables reports JSON file |
powerbi.supplemental.repository_name.N | No | Custom repository name. Defaults to "{environment_name} Additional" |
- Provide either
snapshot_diror one or both of the explicit path properties.
Sample properties file
environment.name.1=Power BI Additional Sources
bigeye.host.1=https://app.bigeye.com
bigeye.apikey.1=bigeye_pak_acbdefg123456
bigeye.allowed.workspaces.1=123
powerbi.supplemental.snapshot_dir.1=/path/to/powerbi/snapshot
Running the connector
With the Agent CLI
./bigeye-agent lineage run -c powerbi_supplementalWith Docker
docker run --rm \
  -v /path/to/config:/app/config \
  --entrypoint bash bigeyedata/source-connector:latest \
  -c "bigeye-connector run -c powerbi_supplemental -p /app/config/powerbi_supplemental.properties"
Summary of Steps
- Create a Service Principal application.
- Create a new Security Group.
- Grant Power BI access to the security group.
- Grant workspace access to the service principal.
Updated 4 months ago