
Connect Salesforce
Set up a Salesforce data source in Bigeye using an External App with OAuth Client Credentials flow
Bigeye connects to Salesforce via a Salesforce External App authenticated with the OAuth Client Credentials flow. The connection is read-only, so Bigeye can query your Salesforce objects to compute metrics but cannot modify any data.
This guide covers:
- Create a dedicated Salesforce service account (integration user).
- Grant object read access to the service account via a permission set.
- Create a Connected App in Salesforce (with the Client Credentials flow enabled).
- Configure the app's policies — pre-authorize the service account and set it as the Run As user.
- Gather connection details from Salesforce.
- Add Salesforce as a data source in Bigeye.
1. Create the Salesforce Service Account
- Log into Salesforce as an administrator. Click the Gear icon in the top right and select Setup. In the Quick Find box, type
Usersand click Users.
-
Click New User.
-
Enter a clear name, e.g.
Bigeye Service Account, and provide a valid corporate email address you can access (Salesforce sends an activation email to it). -
Set User License to Salesforce Integration.
-
Set Profile to Salesforce API Only System Integrations.
-
Ensure Active is checked, then click Save.
2. Grant Object Access via a Permission Set
The service account's profile grants API access but no data access. Grant read access to the objects Bigeye should monitor using a permission set.
-
In Setup, search for
Permission Setsin the Quick Find box and open it. -
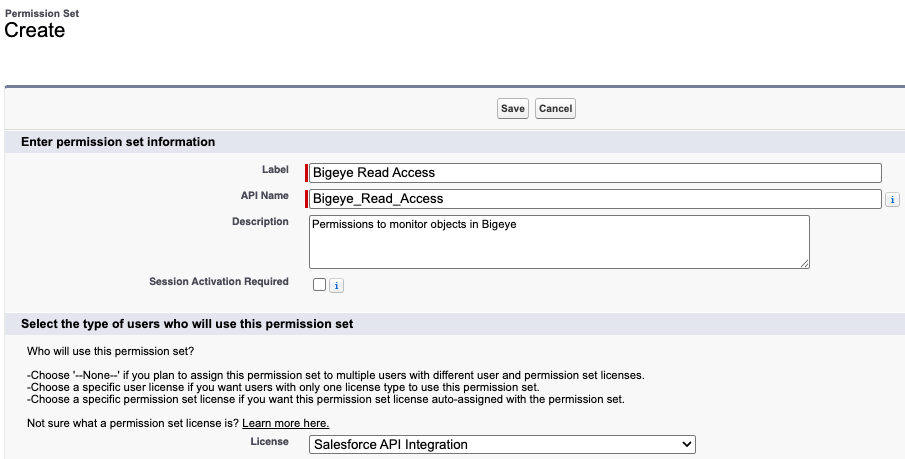
Click New to create a custom permission set, e.g.
Bigeye Read Access. -
Set the License to Salesforce API Integration
-
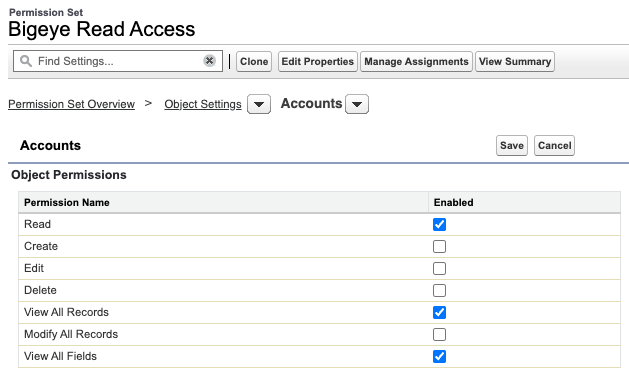
Open the permission set, go to Object Settings, and grant Read access to each Salesforce object you want Bigeye to monitor (e.g. Accounts, Contacts, Leads).
-
Click Manage Assignments → Add Assignment and select the service account user you created in step 1.
3. Create a Connected App in Salesforce
-
In Setup, under Platform Tools, select Apps → App Manager and click New External Client App.

-
Fill out the Basic Information section:
- Connected App Name: e.g.
Bigeye - API Name: auto-populates
- Contact Email: your contact email
- Connected App Name: e.g.
-
Under API (Enable OAuth Settings), check Enable OAuth Settings and configure:
-
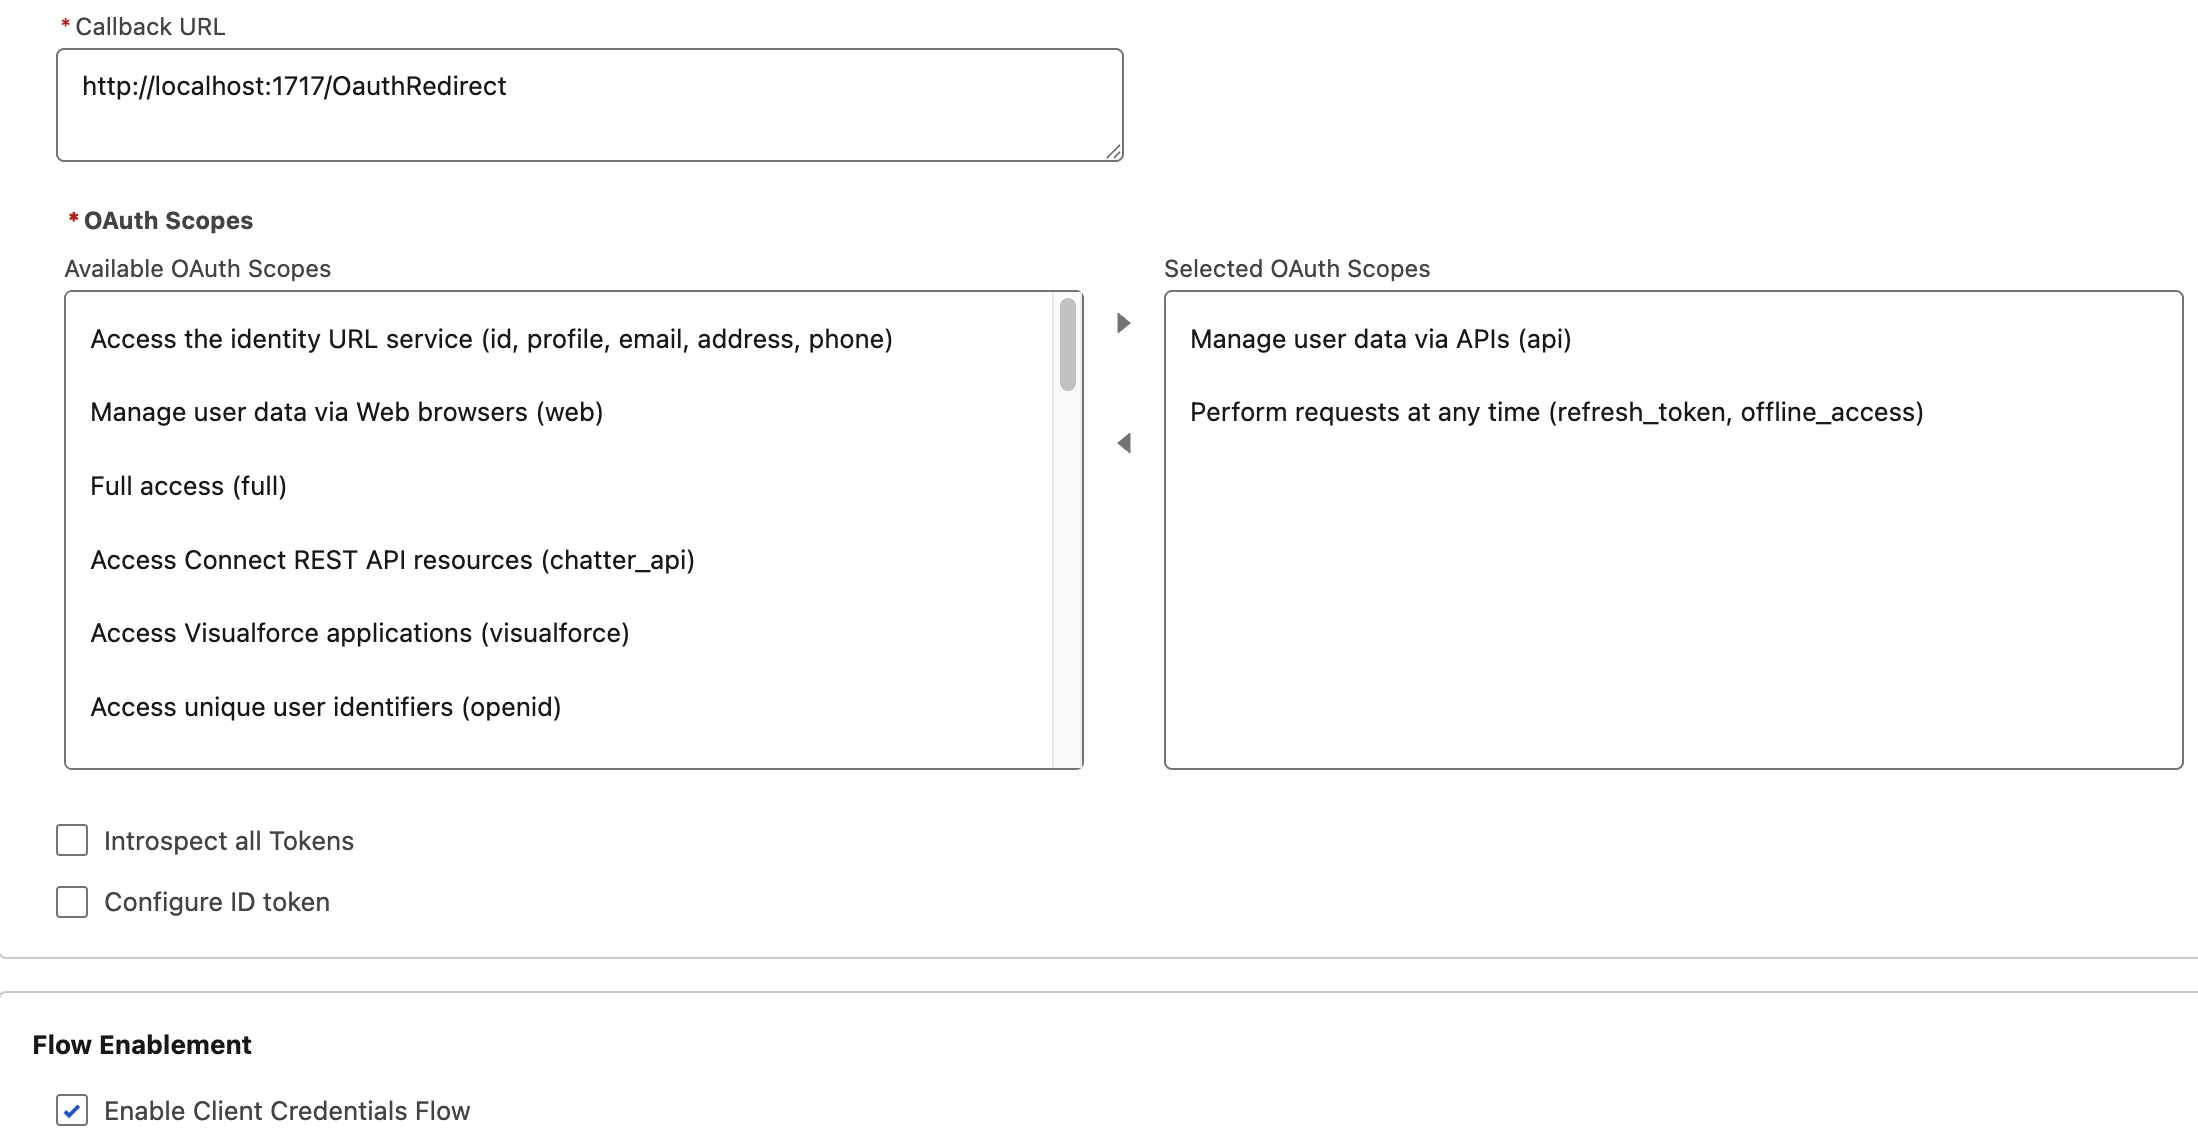
Callback URL:
http://localhost:1717/OauthRedirect -
Selected OAuth Scopes: at minimum add
Manage user data via APIs (api)Perform requests at any time (refresh_token, offline_access)
-
Flow Enablement: Check Enable Client Credentials Flow
-
Security: Leave Require Secret for Web Server Flow and Require Secret for Refresh Token Flow checked.
-
- Click Create. Salesforce will note that changes may take up to 10 minutes to propagate.
4. Configure App Policies and Run As User
Enabling the Client Credentials Flow (step 3) is only half the configuration — Salesforce also needs to know which user the flow runs as and that the app is authorized for that user. This ties the app to the service account from steps 1–2.
-
From Setup → Apps → External Client Apps → External Client App Manager, find your Connected App and click the dropdown → Edit Policies.
-
Under App Policies → Available Permission Sets, select the permission set you created in step 2 (e.g.
Bigeye Read Access) and move it to Selected Permission Sets. This authorizes the service account to use the app.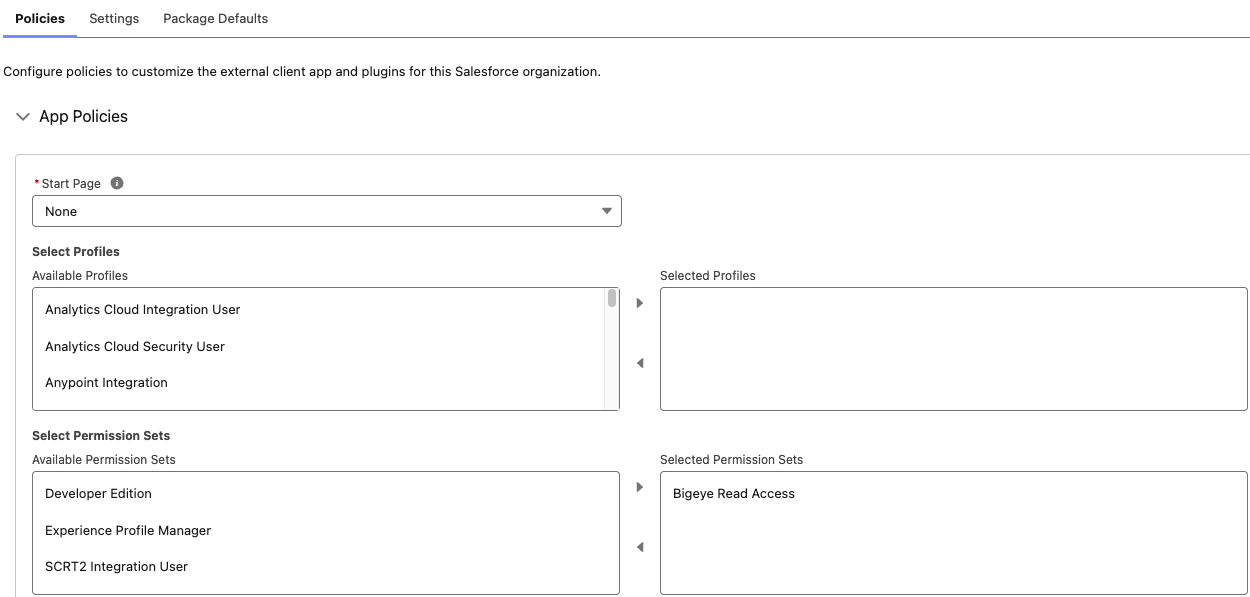
-
Under OAuth Policies, set Permitted Users to Admin approved users are pre-authorized.
-
Under OAuth Policies → Client Credentials Flow, set Run As to the service account user from step 1 (the Username you configured).
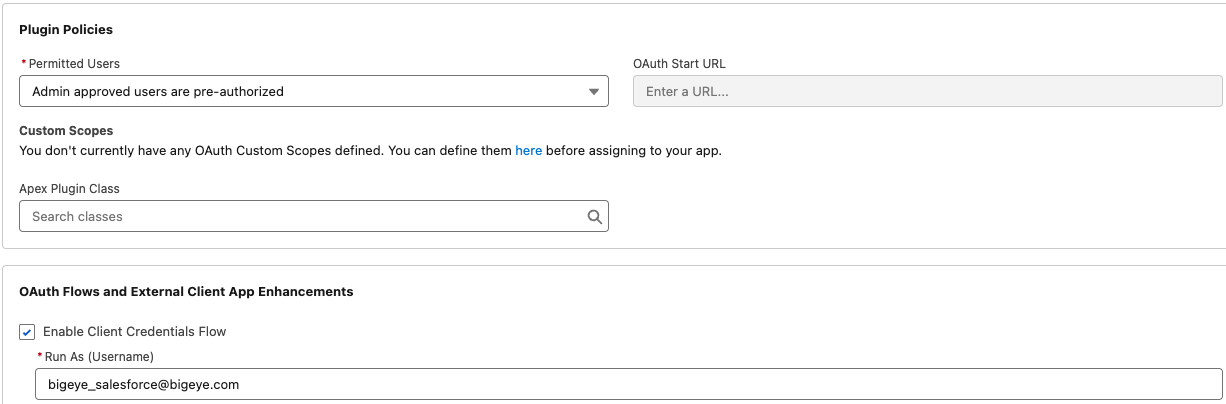
- Click Save.
5. Gather Connection Details from Salesforce
You'll need three values for the Bigeye source configuration.
Instance URL (LoginURL)
Your Salesforce instance URL — what you see in the browser when you're logged in. Example: https://yourcompany.my.salesforce.com.
To confirm: Setup → Company Settings → My Domain shows the current My Domain URL.
Consumer Key and Consumer Secret
- Setup → Apps → External Client Apps → External Client App Manager, find your Connected App, click the dropdown → Edit Settings.
- Under OAuth Settings, click Consumer Key and Secret
- Copy the Consumer Key and Consumer Secret. Treat the Consumer Secret like a password.
6. Add Salesforce as a Data Source in Bigeye
In Bigeye:
-
Go to Catalog → Sources → Add Source and select Salesforce.
-
Fill out the configuration:
| Field | Value |
|---|---|
| Name | A display name for this source. |
| Host | The instance URL from step 4 (e.g. https://yourcompany.my.salesforce.com). |
| Consumer Key | The Consumer Key from the Connected App. |
| Consumer Secret | The Consumer Secret from the Connected App. |
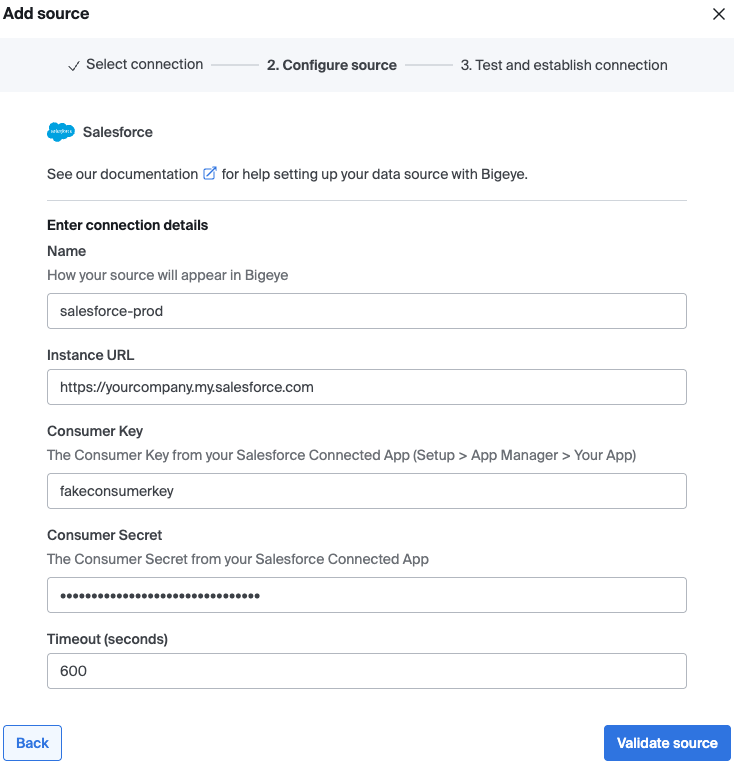
- Click Validate source to validate the connection.
Known Limitations
- Percentile and median metrics are not supported. The underlying SQL engine does not provide a working
WITHIN GROUPorpercentile_contsubstitute. These metrics are hidden from the metric picker on Salesforce sources. - Indexing time. Salesforce orgs typically expose hundreds of standard and custom objects, and Bigeye indexes columns per-object. The first full index of a Salesforce source can take ~10 minutes; subsequent re-indexes are faster.
Troubleshooting
no client credentials user enabledThe Connected App doesn't have a Run As user set. Return to step 2.3 and select an integration user under OAuth Policies → Client Credentials Flow.
invalid_client_id/invalid_client_secretRe-copy the Consumer Key and Consumer Secret from Manage Consumer Details. Salesforce displays the Consumer Secret only after verification — don't trust a previously copied value if it's been more than a session.
Next Steps
- Deploy metrics on the Salesforce objects you want to monitor.
- For agent-based deployments where Bigeye doesn't have a direct network path to Salesforce, see the Bigeye Agent setup guide.
Updated about 1 month ago